Asus UX305 Screen Brightness Linux Control Fix

If you have an Asus Zenbook UX305 upon which you’ve installed Linux (in this case Linux Mint 18 Sarah) they you may have found that while practically everything works ‘out of the box’, screen brightness control with the Function keys does not.

In fact, on the UX305, I found that while Linux Mint would dim the display after a predetermined period, direct control over screen brightness was not possible using the system-settings panel or the taskbar widget.

After getting sore eyes from what is a very good backlight, I went off in search of a solution. I found a bug report discussing the problem on some newer Asus laptops in Ubuntu over at launchpad.net. The various methods being tried seemed to involve a bit of hit and a lot of miss depending on the hardware platform. However, I found a solution that worked for me with a UX305.

(The following assumes some competence dealing with your system’s internals and don’t forget to back up anything you cant afford to lose!)

To begin with:

Comment #10 on the discussion suggested the following:

In /etc/default/grub add (as root):

acpi_osi=

In the quotes on the line:

GRUB_CMDLINE_LINUX_DEFAULT “”

Not forgetting to then run

update-grub

After rebooting, I tried Function keys F5 and F6 and found they brought up the brightness level overlay and adjusted it but the actual backlight level stayed the same.

Asus UX305 Screen Brightness on Linux

The brightness overlay now working

Next, Comment #69 provided the solution to getting the backlight to actually respond to the backlight control.

First create a file called

20-backlight.conf

in

/usr/share/X11/xorg.conf.d

And add the following lines to the file:

Section “Device”
Identifier “card0”
Driver “intel”
Option “Backlight” “intel_backlight”
BusID “PCI:0:2:0”
EndSection

I then rebooted and found that the Function keys were happily now controlling not just the backlight overlay but the backlight itself.

šŸ™‚

It’s not impossible that this fix interferes with some other functionality but I’m yet to encounter any problems.

Installing NoIP2 on Ubuntu 14.04LTS

IĀ  look after a server which is connected to some temperature sensors on a remote site. The site is connected to the internet via a RADSL link on the end of 1.5km of very old copper cable. The reliability of the connection is weak at best and the dynamically assigned IP address tends to change every time the connection drops which can be several times a day.

I recently updated the server from Ubuntu 13.10 to Ubuntu 14.04 Long Term Support which, as it is supported until 2019, should see out the antiquated hardware’s days

In order to communicate with the server remotely, I need to know the current public IP (dynamically assigned) so I need to run a dynamic DNS client on the server to update a remote service. The service I chose for this purpose is No-IP. They offer a free basic DDNS account which meets my needs.

Client wise, I have previously (some years ago) used ddclient to update the IP address to No-IP but have more recently struggled to get the configuration working reliably.

Instead, I now use the NoIP2 client in the following fashion:

First of all, working locally on the server (because that ADSL connection really is that bad!) I download the NoIP2 client:

wget http://www.noip.com/client/linux/noip-duc-linux.tar.gz

Then I extract the archive and cd to the resulting directory:

tar -xvf noip-duc-linux.tar.gz
cd noip-2.1.9-1

The directory may differ if the noip2 client version number is updated.

Now I install the client using:

sudo make install

Next, the client needs to be configured. You’ll need the username and password you selected when you signed up for your No-IP DDNS user account.

sudo /usr/local/bin/noip2 -C

The -C flag tells the installed client to create a new configuration where you enter:

  • Your username (email address for No-IP account)
  • Your password (the one for the above)
  • The interval (in minutes) that you wish to update your public IP address to No-IP
  • A command to execute when the update is successful (you can leave this blank)

At this point, I have a working client that will update your public IP to No-IP. Note that you may need to open port 8245 (outbound) on your router if you have a restrictive outbounds ports setup.

However, if the power on the remote site goes down (and it often does, especially during storms) the server will reboot but there is nothing to tell it to restart the noip2 client.

To remedy this, I create a new file in init.d using the nano text editor:

sudo nano /etc/init.d/noip

I add the following to the file (referenced in the README):

#! /bin/sh
case "$1" in
    start)
        echo "Starting noip2"
        /usr/local/bin/noip2
    ;;
    stop)
        echo -n "Shutting down noip2"
        for i in `noip2 -S 2>&1 | grep Process | awk '{print $2}' | tr -d ','`
        do
          noip2 -K $i
        done
    ;;
    *)
        echo "Usage: $0 {start|stop}"
        exit 1
esac
exit 0

The Ctrl-x to exit nano and y to save the file.

I need to make the script executable so I issue:

sudo chmod 755 /etc/init.d/noip

To tell the system it needs to run the script after booting, I open up and edit rc.local

sudo nano /etc/rc.local

Find the line that contains exit “0” and on the line above add:

/etc/init.d/noip start

Again, Ctrl-x to exit nano and y to save.

Now when you reboot your server, the noip2 service should be running.

You can check whether it is running by issuing:

ps aux | grep noip2

You should see the noip2 service listed in the result.

After the update interval that you set when you configured the No-IP client, you should be able to reach services on your server from the no-ip dynamic hostname that you are assigned ie: your-noip-name.no-ip.com. If you’re unsure of this name, you can check it by logging into your No-IP account and looking it up. Don’t forget, you may need to open the relevant ports on your router to match the services you’re trying to reach on your server.

This should provide a relatively simple and free alternative to paying for a fixed ip address for your home or remote Ubuntu 14.04LTS servers. Remember that in order to keep your NoIP hostname, you need to update your IP ever thirty days at the latest or the hostname is released for re-use. Just keep the noip2 client going at a regular update interval and this should not be a problem.

Epson Perfection V300 Scanner in Ubuntu 8.10

Here follows a quick description of getting an Epson Perfection V300Photo running in Ubuntu 8.10 Intrepid.

epson_v300_photo

Firstly, the scanner has sane support but requires a ‘non-free’ (as in speech) driver element.

Thinks you need:

Make sure sane and sane-utils are installed:

sudo apt-get install sane sane-utils

Then you will need to ‘borrow’ libltdl3 from Ubuntu 8.04. You can find it here: http://packages.ubuntu.com/hardy/libltdl3

And finally, you need iscan and the esci driver as DEB pacakages from AVASYS. You need to go through the form-driven system here: http://www.avasys.jp/lx-bin2/linux_e/scan/DL2.do

Once you’ve installed that little lot, you need to add a lineĀ  to one of your sane config files:

sudo gedit /etc/sane.d/dll.conf

Add epkowa to the list of drivers found there.

You should now be able to use Xsane or any program which calls Xsane (such as GIMP) for scanning.

I’ll readily admit, it’s a really clunky installation process. It seems largely Epson’s fault. The do provide the Linux driver but it’s a binary and doesn’t appear to be licenced in a way which would enable it to be bundled with a Linux distribution. It would either require Epson to release the sourcecode for their V300 driver or for someone to successfully reverse-engineer the scanner software interface for this to become easier ie: direct sane support.

References:

http://ubuntuforums.org/showthread.php?p=6297403
http://ubuntuforums.org/showthread.php?t=978407

Presario 2100 Frequency Scaling with Ubuntu

I recently installed Ubuntu Linux 8.10 on a Compaq Presario 2100 laptop. Specifically, this model of the 2100 series has an intel Celeron mobile processor which nominally runs a 1.7Ghz.

Naturally, on a laptop you don’t want to be running you CPU at full-chat all the time as the fan can be noisy and the flesh on your legs may burn. By default, Ubuntu didn’t work out how to step down the speed of the CPU which is unusual.

I could swear that I’d had this laptop throttling it’s cpu frequency before and with a little brain wracking and internet searching, I [re]found the solution.

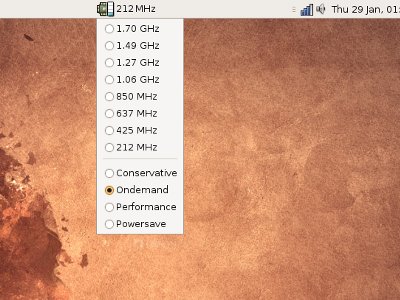
You need to activate the p4-clockmod module using the command sudo modprobe p4-clockmod. Once this is done, you can activate the Gnome panel cpu frequency applet (right-click panel>Add to panel>CPU Frequency Scaling Monitor)

cpu_widget_ubuntu

You should now be able to choose a speed from 1.7Ghz down to 212Mhz from the list or select one of the automatic speed governors.

You still need to make sure that the kernel module is loaded every time at boot time. To do this, use sudo gedit /etc/modules and add the line p4-clockmod.

Now, every time your machine starts, the cpu governors will be activated and you’ll hopefully have a quieter and cooler experience.

Fixing “locales” error on Ubuntu

On a Ubuntu 8.04LTS server, I recently had an annoying case where the system would spew an error out seemingly every time a command was executed.

The error format was thus:
perl: warning: Setting locale failed.
perl: warning: Please check that your locale settings:
LANGUAGE = (unset),
LC_ALL = (unset),
LANG = "en_US.UTF-8"
are supported and installed on your system.
perl: warning: Falling back to the standard locale ("C").
perl: warning: Setting locale failed.
perl: warning: Please check that your locale settings:
LANGUAGE = (unset),
LC_ALL = (unset),
LANG = "en_US.UTF-8"
are supported and installed on your system.
perl: warning: Falling back to the standard locale ("C").

Clearly something wasn’t happy and that something appeared to be my ‘locales‘. They are actually quite self-explanatory, they define the language and location of a user in order to allow the correct presentation of the user interface. Great if you want to avoid having to read Kanji on the command line but not so much use if it’s just Crontab talking to the root account and filling up the mailbox with errors.

With a bit of searching, I found a simple enough answer. Obviously, as the error states, the locales need to be set. To do this issue the command:

sudo locale-gen

You can add your preferred locale to the end of this ie:

sudo locale-gen en_US.UTF-8

…which will generate the US English interface language with UTF-8 character formatting.

Then issue:

sudo dpkg-reconfigure locales

Hopefully, your locales will be set and that annoying error will be banished both from the console and your root inbox.

Credit to this thread at Ubuntu Forums

Logitech Quickcam S 5500 for Business with Ubuntu review

Having never tried using a webcam with Ubuntu, I recently picked up a Logitech Quickcam S 5500 – more specifically, the ‘for business’ model.

As far as I can tell, the ‘for business’ version denotes the package rather than any difference in the camera itself. The package was a minimalistically small box with the camera, a compact disk and a manual tucked inside. The exterior motif was simple, just a picture of the camera, a ‘certified for Vista’ logo and a product code panel. This is the sort of packaging that really makes sense, the box is no bigger than it needs to be and doesn’t waste materials which will ultimately be disposed of.

quickcam_s5500_for_business_box

The included software (this may be the distinction of the ‘for business’ moniker) is Logitech’s Quickcam for Enterprise on a CD. Presumably, the consumer oriented version of the S 5500 package would come with different software. Unfortunately, from the point of a review, I left the software in the box untested as I would be connecting this camera to a Ubuntu 8.10 system with which the software would be incompatible.

quickcam_s5500_1

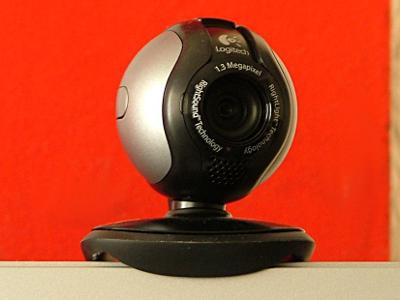
The camera itself is just a bit bigger than a golf-ball with a ‘poseable’ foot/mount and a slide-down lens cover. The sensor is a true 1.3 megapixel unit having a native resolution of 1280×1024 pixels. The USB lead which conveys both video and microphone audio from the camera is about 2 meters long and comes with a thoughful tag near the USB connector which identifies the device to make it easy to find it when unplugging it from a USB hub.

quickcam_s5500_back

Having connected the device to a Ubuntu 8.10 box, ‘lsusb’ reports:

Bus 002 Device 001: ID 1d6b:0001 Linux Foundation 1.1 root hub
Bus 001 Device 004: ID 046d:09a1 Logitech, Inc.
Bus 001 Device 001: ID 1d6b:0002 Linux Foundation 2.0 root hub

The two ‘hub’ entries are also apparently generated by the camera.

If found the camera to be working quite literally ”out of the box’ with xawtv. The camera complies with the “USB Video Class” webcam standard and is already supported by the Linux UVC drivers. Sadly, the included luvcview application which allows finer control of the cameras features wasn’t working with the S5500 so I ended up pulling the trunk sources from their git repository and building them myself. This got luvcview working and allowed manual control of the cameras exposure settings.

Logitech includes what they call “Rightlight Technology” with this camera. Put simply, the camera varies it’s exposure duration automatically depending on the available light. For instance in broad daylight, the camera will perform at 30fps. With only the light of the computer monitor on my face in a darkened room, the camera will continue to produce a good quality image at a much lower frame rate (typically 5fps). When changing the exposure manually, you are directly changing the frame rate. The sensor still captures a suprising amount of detail when deliberately set to underexpose.

The field of view is reasonably wide although not excessively so. You could confortably sit two people at a reasonable distance from the screen in front of the camera and have them in frame. The picture is generally quite sharp and well focused – the lens appears to be fixed focus – but there are some minor abberations at the edge of the image presumably caused by the size and type of lens in use. It’s still an extremely good quality image for a webcam.

Again, in the true tradition of being the most annoyingly lax reviewer ever, I neglected to test the integrated microphone which appears to sit just below the lens. The bezel touts “Rightsound Technology” so perhaps this microphone provides automatical level seeking.

There is also a button on the left side of the camera which would provide call activation/cancellation features in some Windows software but doesn’t have a default purpose on most Linux based software.

From the end user perspective, it’s ever so slightly early days for UVC cameras on Linux. Ubuntu 8.10, while supporting the Logitech S5500 has some shortcomings. For instance, Ekiga, the packaged software videophone doesn’t support UVC cameras in the shipped version. I reckon it’ll all be pretty much plug-and-play by the time Ubuntu 9.04 comes around in April though. The latest versions of Ekiga which will be packaged with Jaunty JackelopeĀ  already supports UVC.

quickcam_s5500_2

Finally, the packaging reduced ‘for business’ version of this camera that I bought was actually a bit cheaper than the consumer counterpart.

I’m definitely recommending this product as a quality webcam. Naturally, I don’t intend to use it as a normal webcam but rather I intend to try using it as a security camera in conjunction with Zoneminder. šŸ˜‰