New Japanese Linux Android HRP-4C

I’ve found the Japanese to have a somewhat worrying obsession with robots; everything from the 4-foot tall Asimo types to the 50-foot high flying types.

They also make some rather impressive bipedal robots which can be seen in videos all over the internet accomplishing impressive feats such as running and tackling stairs. They do, however, seem to have a slightly odd gait which looks as if it was borrowed from a ‘dog-walker’ as the feet and knees preceed the robot noticably as it moves. Apart from Hubo, there have been few attempts at turning the ‘robot’ into an ‘android’

Now, researchers at AIST (National Institute of Advanced Industrial Science and Technology) have produced a biped Android (or more correctly a Gynoid) known as HRP-4C.

The robot has the broadly realistic human proportions correspondent to a Japanese woman and also comparable weight. The simulation of human likeness only extends to the face which has some level of animation and the hands which I am yet to see change pose during a demonstration. The rest of the body appears as if in a fitted suit of armour.

Apparently she Linux in the form of an AIST developed platform known as ‘Actual Time Linux’ (ART-Linux2.6).  Although difficult to decipher from the translated text, it appears that much of HRP-4C’s development revolves around and contributes to open projects.

The walking gait is rather more natural in appearance than an Asimo unit but could still do with more damping as there is an obvious jarring in the step. Thus far I have only seen the gynoid perform basic walking and a short bow. On examination of a translation of the japanese information page, it seem that the unit is designed for entertainment or fashion modeling. An odd choice of target market to my mind but the size/weight constraints probably prohibit any industrial uses.

The HRP-4C stands about 1.6m tall and weighs approx 50kg.

[youtube]http://www.youtube.com/watch?v=brD5D0ytD04[/youtube]

If they could increase the abilities of an android of this scale, I reckon it could play a critical role in caring for Japan’s ageing population. I’ll be really impressed but don’t doubt that I will soon see a biped android powerful enough to lift a human safely.

In the mean time, I’m saving up for my RX-78NT1 Gundam 😉

Marvell SheevaPlug: Linux Powerbrick

Marvell of the USA have announced a sub $100 (projected sub $50!) computer built into a ‘power-brick’ or ‘wall wart’.

sheevaplug-devkit

Bascially, the device is the size of a regular plug-in power adaptor and does just that; it plugs into the mains socket and runs. It’s power consumption is supposedly about 5 Watts.

  • 1.2Ghz ARM CPU
  • 512MB RAM
  • 512MB Flash storage
  • Gigabit wired ethernet
  • USB 2.0 socket
  • SDIO Expansion

Marvell already claim linux distributions to be running on the device and the possibilities for utilisation seem endless.

The $99 “development kit” is effectively a pre-release model and I’m really tempted to order one in to see what I can make of it.

Unfortunately, Slashdot got hold of this before I did so you will be able to see the Marvell SheevaPlug over at Linux Devices when their server stops smoking 😉

You also be able to order the SheevaPlug devkit directly from Marvell

Epson Perfection V300 Scanner in Ubuntu 8.10

Here follows a quick description of getting an Epson Perfection V300Photo running in Ubuntu 8.10 Intrepid.

epson_v300_photo

Firstly, the scanner has sane support but requires a ‘non-free’ (as in speech) driver element.

Thinks you need:

Make sure sane and sane-utils are installed:

sudo apt-get install sane sane-utils

Then you will need to ‘borrow’ libltdl3 from Ubuntu 8.04. You can find it here: http://packages.ubuntu.com/hardy/libltdl3

And finally, you need iscan and the esci driver as DEB pacakages from AVASYS. You need to go through the form-driven system here: http://www.avasys.jp/lx-bin2/linux_e/scan/DL2.do

Once you’ve installed that little lot, you need to add a line  to one of your sane config files:

sudo gedit /etc/sane.d/dll.conf

Add epkowa to the list of drivers found there.

You should now be able to use Xsane or any program which calls Xsane (such as GIMP) for scanning.

I’ll readily admit, it’s a really clunky installation process. It seems largely Epson’s fault. The do provide the Linux driver but it’s a binary and doesn’t appear to be licenced in a way which would enable it to be bundled with a Linux distribution. It would either require Epson to release the sourcecode for their V300 driver or for someone to successfully reverse-engineer the scanner software interface for this to become easier ie: direct sane support.

References:

http://ubuntuforums.org/showthread.php?p=6297403
http://ubuntuforums.org/showthread.php?t=978407

Swapping PCI for USB to save energy?

After discovering that Hauppauge WinTV NOVA-T PCI cards seem to draw anything up to 9 watts each when in operation, I’ve been theorising about ways and means to reduce the overall power consumption of a MythTV ‘backend’ server.

One option I considered was replacing two NOVA-T cards with a single NOVA-T 500 which has two tuners. The glaring problem with that approach is that I have no means of knowing before-hand whether the NOVA-T 500 doesn’t just draw twice as much power as a normal NOVA-T.

The other alternative I’ve considered is a NOVA-T USB Stick. It’s a really simple device involving a USB connector at one end and an aerial connector at the other. In theory, the limitations of the USB system should dictate that one of these sticks will not require more than 2.5 watts (more likely no more than 2 watts).

Hauppage NOVA-T USB stick

If so, I would be limited to one stick per USB slot but that’s no great hardship as I have at least four USB slots to play with.

There is a catch though, having done some reading out on the intertubes, it appears there is a problem with tuning on the NOVA-T sticks and the current version of Mythbuntu (which I have used to configure MythTV systems up until now)

Using a Draytek router to ping clients via telnet

I recently needed to check the availability (or rather pingability) of a system on a remote network. I didn’t have a VPN connection to that network but I did have administrative access to the network’s router which was a Draytek Vigor 2600.

As well as the expected web interface, the Vigor 2600 (as with many other Draytek routers) also includes a telnet server with a suite of command line tools.

To telnet to the router from both Windows & *nix systems you use the command:

telnet <router ip or hostname>

You will then be prompted for a password. This password is the same as the web interface password.

Once logged in, you can type ‘?’ and expect to be presented with a set of available commands which may look roughly like those below.

% Valid commands are:
upnp         ddns         exit         ip           ipf          ddos
urlf         p2p          log          quit         srv          show
mngt         sys          vpn          wan          port         wol

The ping command is a subcommand of ‘ip’ so to use it we type:

ip ping <host ip address>

The router will then send five pings to the target host and display a report of each ping, latency and packet loss.

I hope this comes in handy for others 🙂

Presario 2100 Frequency Scaling with Ubuntu

I recently installed Ubuntu Linux 8.10 on a Compaq Presario 2100 laptop. Specifically, this model of the 2100 series has an intel Celeron mobile processor which nominally runs a 1.7Ghz.

Naturally, on a laptop you don’t want to be running you CPU at full-chat all the time as the fan can be noisy and the flesh on your legs may burn. By default, Ubuntu didn’t work out how to step down the speed of the CPU which is unusual.

I could swear that I’d had this laptop throttling it’s cpu frequency before and with a little brain wracking and internet searching, I [re]found the solution.

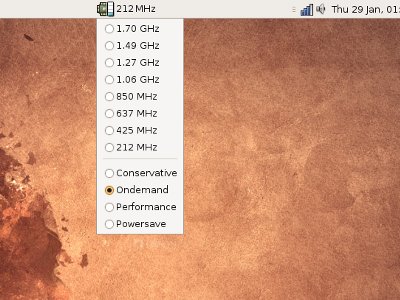
You need to activate the p4-clockmod module using the command sudo modprobe p4-clockmod. Once this is done, you can activate the Gnome panel cpu frequency applet (right-click panel>Add to panel>CPU Frequency Scaling Monitor)

cpu_widget_ubuntu

You should now be able to choose a speed from 1.7Ghz down to 212Mhz from the list or select one of the automatic speed governors.

You still need to make sure that the kernel module is loaded every time at boot time. To do this, use sudo gedit /etc/modules and add the line p4-clockmod.

Now, every time your machine starts, the cpu governors will be activated and you’ll hopefully have a quieter and cooler experience.