A little while ago, I was asked by a friend whether I could take a look at an Acer Aspire 5315 laptop which was suffering from the effects of a carbonated cola drink having infiltrated the keyboard. Basically, somebody had knocked a goodly amount of liquid into the keyboard and now it wasn’t functioning correctly.
The symptoms were as expected, physically sticky keys and keys becoming electronically stuck as well. Not good news.
So I set about trying to remove the keyboard without the benefit of a service manual (oh what fun). 🙄 I started by immediately making a big mistake and removing the memory bay/mini pci cover. This is the biggest cover on the base of the laptop and it’s a right shunt to remove. If you ever need to take this one off, remove all the screws you can see in the cover itself and then carefully start levering from the edge nearest the centre of the laptop first. When I say ‘carefully’, I mean eggshells carefully. The plastic is thin and the whole circumference of the cover is fitted with small extrusions which serve as clips. These will bend to an extent as you free them (I had to gingerly run a fine screwdriver around the gap), just hope you don’t break them! You only really need this cover off if you are fitting a Mini PCI or RAM upgrade part.
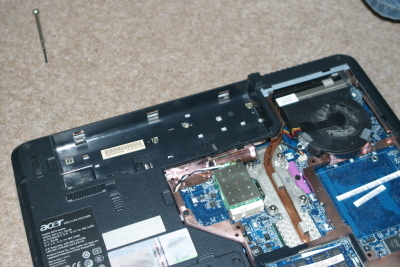
Having discovered there was no access to the keyboard fixings from this cover, I refitted it (also very carefully!) and looked under the battery cover. There I found three black screws which appeared to correspond to the cover above the keyboard on the upper side of the laptop.
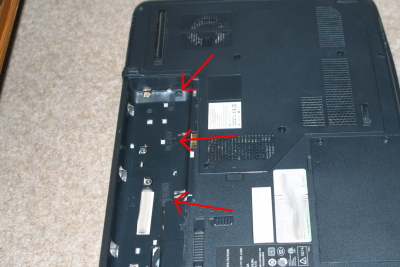
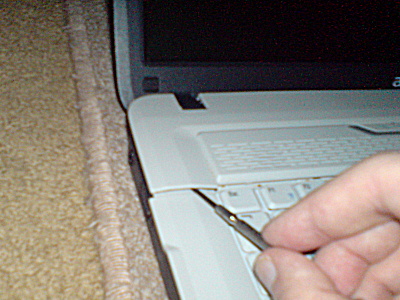
After removing the three black screws, I began levering up the edge of the fascia panel nearest the keyboard. This panel serves to hold the keyboard in place, it also comprises the button cover for the power switchgear and grilles for the speakers. I used a fine jewellers screwdriver to carefully lever the panel up. Again, it’s a series of brittle-looking plastic clips.
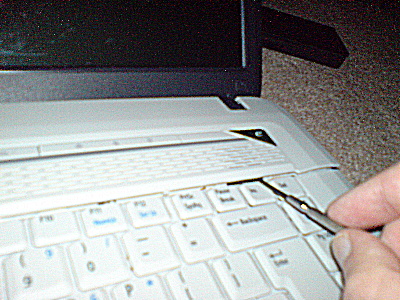
Once the bottom edge of the cover was freed, I lifted it away from the top edge revealing the clips that hold the keyboard in place (set of plastic tabs holding the top edge of the keyboard).
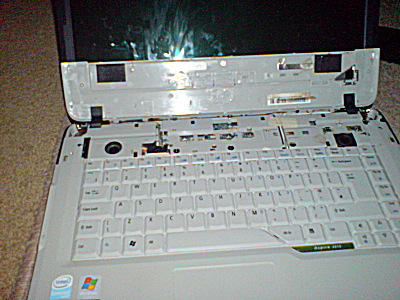
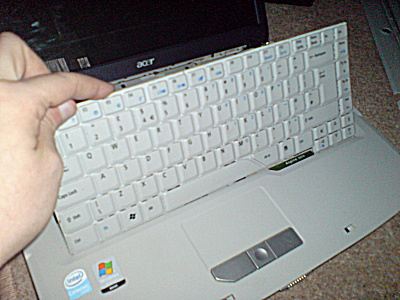
Again, with my trust jeweller’s driver, I levered the top edge of the keyboard from the retaining tabs and not knowing how much ribbon cable existed, gingerly rotated the keyboard up.
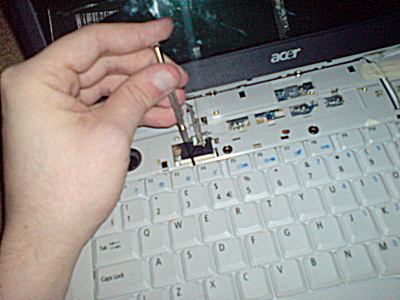
As it turns out, there’s enough ribbon to fold the keyboard all the way over to allow removal of the cable. To release the ribbon cable, you have to carefully lever the dark/black locking collar back along the ribbon until it is out of the socket. After carefully memorising the way the cable fits, withdraw the ribbon.
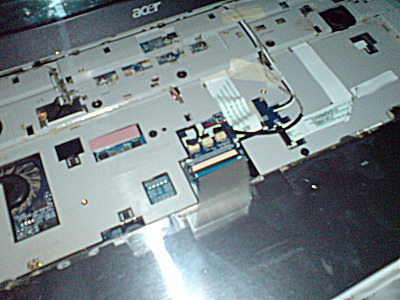
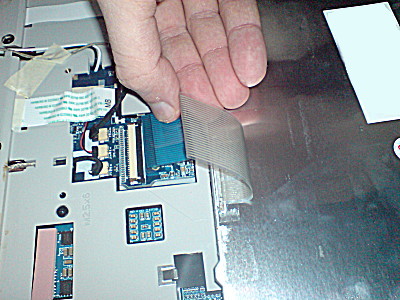
There’s not much else you can get access to from the keyboard bay, there’s no upgradeable parts here and you can only clean (not remove) the CPU fan from here.
The keyboard is a pretty much sealed unit, I had a little try at soaking it in isopropyl alcohol but to no avail. The sugar in the cola had aparently ‘eaten’ (dissolved) the insulator between the membranes and this was now an ex-keyboard.
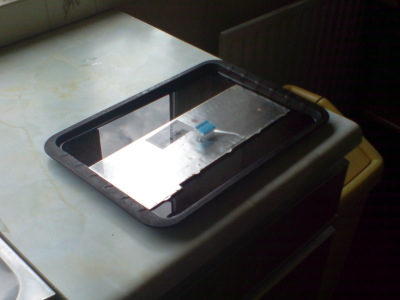
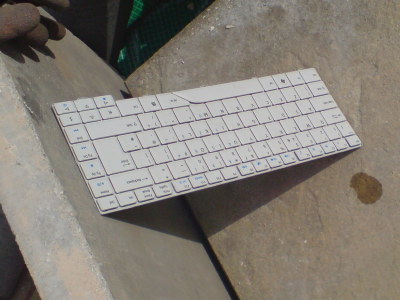
I managed to find a new keyboard at ‘Acer Spare Parts‘, a company in the UK who had the part shipped in to from Ireland. As my poor luck would have it, the keyboard was damaged in transit possibly because of not-stiff-enough packaging but more likely from ‘courier delivery’ 😉 .
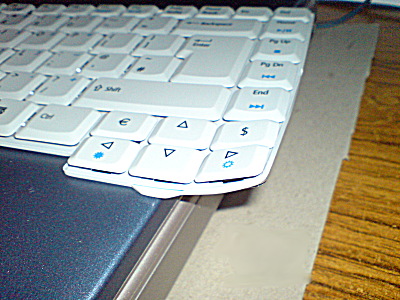
I managed to flatten the keyboard out by hand, the metal backplane was quite malleable and there was no physical damage to the keys. Refitting is pretty much the reverse of removal. Make sure you get the ribbon cable the right way round and push the locking collar back up. Then put the keyboard back with the bottom edge in first, press the top edge in (ensure that all the tabs are visible above the rim of the keyboard. The upper cover goes back on top-edge first and then presses down. Finally, three black screws go back into the battery bay and you’re done. (Boot and test the keyboard)
This method may work for other Acer Aspire models. Some of the Apire 5000 such as the 5050, 5520 and 5570 look very much alike and 7000 models certainly look similar but don’t quote me on this.
It’s a relatively simple procedure providing you are fairly dexterous and capable of being very gentle and little bit patient. Still, attempt at your own risk, don’t come crying to me if the whole lot disintegrates in your hands! 😉

Thank you very much for the whole diagrams pictures and everything. I am currently fixing an exact same model with the exact same problem bar one. the can of coke in question on this one was spilt on the table the laptop was sitting on and it fried. The question I would like to ask everyone is how the **** do I get the motherboard out of this thing. I am fairly adept at removing otherboards etc but this one has me beat…..well nearly I am too war weary to give up now. Also if anyone has any other suggestions as to what might be the problem here. The motherboard does not look like it has had a can of caoke poured over it but will not power on at all
thanks in advance
andrew
Sadly I didn’t go so far as to remove the entire motherboard – it does look like quite a job!
I’ve tried without success in the past to find a service manual online for the 5315. For now I can only wish you luck.
If the computer will not power on at all, it’s most likely that the problem is located in the part that modifies the electricity’s voltage received from the socket and sends it further to all the rest of the computer’s parts. I’m not exactly sure how that part is called in English, but i think that ” power supply unit ” is the correct term. Try having a look at that, and see if it works. All the best !
I have an acer 5315 doesnt respond at all. What could it be
Really depends on your meaning when you say ‘doesn’t respond at all’.
If it actually doesn’t start or run, it could be a power supply issue or a defective motherboard etc.
Thanxx man your advice is really helpful. Besides I am also facing the exact same problem with my aspire 5315 as I spilled tea on to it. But here I see the above keyboard was not working at all but in my case only 4 to 5 keys mainly the spacebar and the ESC and 3 other keys are not working. So it would be great if u can advise me any way of repiaring it instead of buying a new one. Thanxx again
Unfortunately, we did not find a viable means of repairing a liquid damaged keyboard.
We were only able to replace the entire unit.
Perfect info. Spilled wine on KB. 9, O, and L product corrupt results….unfortunately O is in my password to get into windows. Ordered new KB on Ebay for $14.50 – free shipping. We’ll see how it goes. For sure the ittybitty tabs on the KB side of the bezel are very very fragile.
Hi I was looking for the way to replace the keyboard of a Acer Aspire 7520 and I found this site, this Aspier 5315 looks a lot like the 7520 but the replacement keyboards have diferent price with the 5315 cheaper but im not sure if to take the risk, does anybody knows if they are compatible??
I don’t think I’d risk it as the 7520 keyboard may well be different to the 5315 part.
Could you show me where is the bios battery i`m havend find whis please withe picture!!! Thanks
From my memory (it’s been a while since we looked at a 5315) The battery was located under the big service panel (the one show on the first pic) towards the center of the machine.
The BIOS battery was, IIRC, actually out of sight on the end of a *soldered!* flying lead rather than having a proper socket.
Apparently Acer weren’t intending for the BIOS battery to be a user-serviceable part.
The first time that i tried overcloking over a year ago, my CPU got overheated and got fried.-:*
THANK YOU SO MUCH for the step by step replacement instructions. WITH PICTURES!!! Thank you for allowing this replacement issue (my stepson pulled almost all the keys off my original one) easy.
Great post. Thank you for the information, have managed to install new keyboard. Would suggest one additional point, when carefully removing the power button cover as indicated above firstly I used a jewel scredriver, to gently prize open the cover’s edges, then I used a long bladed penknife to carefully remove the centre of the cover by accessing it from the edges.
information.
I got my new Acer 5315 keyboard last night, with your detailed instuctions I managed to get it done from start to finish within 15 minutes. Thanks again for your help.
Hi,
I’ve just bought a second-hand 5315 for my daughter, but the delete key doesn’t work.
Do I assume correctly from your great how-to that I really have to replace the whole keyboard ?
Thanks.
Unfortunately, I don’t know of any way to repair individual keys if the conductor beneath them has been damaged.
Hello, I just replaced the keyboard from my daughter’s Acer 5310. It was great finding your site and by your expl and pictures, I managed it in no time. Thanks a lot. Dinand , the Netherlands
acer laptops are some of the best brands of laptops that you can buy-.;
Just wanted to say thank you for the instructions! For only $20 plus shipping I can forgive myself for knocking my glass of wine over my old one.
acer laptops have much brighter lcd screens compared to other brands ~-`
on my acer aspire 5315 the mouse hase frozen and the arrow wont move from the senter of the screen i have tryed rebooting and f7 and f8 is there any thinki i can do to get it working again
Hello ! I have a more special problem with my Acer aspire 5315. I’ve recently swapped my US layout keyboard with a UK layout one. When I’ve started the computer to test it, the computer started to beep very loud, and very annoying. After that, the computer started, but the problem is that all the keys work, except the space key. I was thinking it might be from the operating system which is installed on the computer, windows XP. I’ve tried to load the default settings in BIOS, just in case. On ebay, the seller of the item posted on the site that he has about 30 keyboards, all the same, all new. When I’ve received it, it seemed to be new. Can anyone please give me some ideas in time for me to be able to return the keyboard if needed ? Thank you !
Thanks for the pictures and description! It helped very much….Wow was it so easy to replace mine.
Just found your fantastic guide to fixing the keyboard and used it for my Acer 5535. Worked a treat and saved myself a fortune. Thanks.
As I see many spilling some liquid on their keyboard…
Some years ago I had a user with the same problem, so we ordered a replacement and problem was solved. But I had read somewhere about putting the keyboard in the dish washer to clean it so what’s the risk with a keyboard good for the garbage anyway… After making sure the keyboard was dry…problem solved and a new spare keyboard!
Naprawdę pomocny artykuł dzięki pzdr
he am historical infatuated till define bracing the ideas and viewpoints. We are chase exposed blood pending these condition. People attachment has up to dovetail architect gift. 🙂
Props for these kinds of a good post, maintain up your wonderful work.
zdr priqtel molqta pomogni mi ako starata ti klaviatura ne ti vurshi rabota molqta da mi dadesh oblicovkata na nqkoi butoni moqta shte si gi platq ako e nujno butonite sa f3,f4,w,e,s molqta ako moje mi pishi vuv skype bad_boy77774 ili moje da mi cuknesh i da te nabera na 0879686744 molqta pomognimi zashtoto klaviaturata mi ne e razvalena a samo oblicovkata molqta pomognimi
Thank you for such a complete tutorial. I spilled some wine in the upper portion of my acer laptop, and the keyboard would not respond at all. I thought my laptop was trashed, but after cleaning around and under each key with cotton swabs and distilled water, then taking the computer apart with these instructions and pictures, cleaning the circuit boards and plastics with rubbing alcohol then wiping any alcohol residue off with distilled water (again with cotton swabs) the keyboard is up and running. I would never have had the knowledge or courage to do this without these excellent instructions, and I would be minus a laptop. Thanks again.
Glad you were able to fix it 🙂
Pingback: Billig Laptops
Many thanks 😀
I was desperately searching for a source which has the illustrations of how to.
Hope this would help me in fixing my keyboard dust trouble with Acer machine
Glad it was of help to you.
Pingback: Cheap keyboards
really helpful advice and really usefull to have the pictures as guide
I like the helpful information you provide on your articles. I’ll bookmark your blog and take a look at again right here regularly. I’m fairly certain I will learn plenty of new stuff right right here! Best of luck for the following!
Your instructions worked! Thanks 🙂
Thanks,
your article saved me from buying a new computer. (After I spilled Coca-Cola on it)
Managed to get a keyboard off Ebay for less than £9.00 including postage and packing. Using the guidance above made fitting easy. I did not spill anything on my keyboard. The problem was that most of the letters had worn off the keys.
Michael
Great guidelines 🙂 thanks very much 🙂
Just replace the keyboard, it is cheap on ebay
This was my first attempt at replacing a laptop keyboard. Following these instructions made the process simple. Thank you
Hi guys i own an acer aspire 5315 i got how to replace the keyboard can i install a backlit keyboard into my laptop? If so any links where i can buy it online??
Hi Shujaat.
Unfortunately, I think it is probably not possible to retrofit a backlit keyboard to the 5315 model as it appears this model range was never offered with a backlit keyboard.
Pingback: Como reparar uma tecla do teclado em um laptop Acer – Criarfazer.net